Seeing Stars

Star Pattern
I’ve moved all my free patterns to one location. You can find this pattern here:
Thanks for stopping by!
Star Pattern
I’ve moved all my free patterns to one location. You can find this pattern here:
Thanks for stopping by!
 I love math. It was always one of my favorite subjects in school. I find comfort in numbers-nerdy, I know. Maybe that is why I love crochet designing. I thrive on finding the proper stitch repeats to manipulate yarn into creating the vision I have in my head. Many are afraid of math, don’t be. Math CAN be your friend. For example, if you need to calculate the yardage used in a project. Maybe you are testing a pattern for someone and they want the actual yardage you use, or maybe you have some yarn, not a full skein, and want to know if it’s enough to make that special hat pattern. Maybe you are math geek like me and are just curious. Whatever your reason for calculating your yardage, you can do it and it’s easy.
Supplies needed-
1. Determine how many yards per ounce (or grams).
Yarn labels state yardage and ounces/grams. Say your skein has 3.5 ounces and 220 yards. Divide total yardage/by total ounces. In this example, that works out to approximately 63 yards/ounce. (220/3.5=62.857).
2. Determine how much yardage you used.
You need to weigh your yarn BEFORE you start your project (if you aren’t using new skeins) then weigh your yarn AFTER you finish. Subtract ending weight from starting weight to determine weight of yarn used. Then multiply by amount of yards per ounce as determined from the label in the first step. In the above example, if you used 1.5 ounces of yarn then yardage would be 1.5 X 63 = 94.5 yards. That’s it!
There are 28 grams per ounce so if you measure in grams, you will have a much more accurate calculation. I have a digital kitchen scale. I believe I bought at Wal-Mart for about $20. I know some people use the scales at local post offices. Just remember to always save the yarn labels of partial skeins. That way, you can calculate how much yardage you have on hand. If a pattern states estimated yardage needed to complete the project, you’ll know right away if you have enough or not.
Have fun!

I start almost all of the hats I make with a magic circle. It’s a fantastic way to start anything that is worked in the round if you want to be able to control the amount of “holey space” in the middle. With the magic ring, you can pull the hole as tight as you physically can leaving no gaping hole in the middle of your hat. If a pattern suggests you chain 2 then work a round in the second chain, replace it with the magic ring and you’ll be real pleased with the results.
I’ve seen this method called the magic ring, adjustable circle, magic loop and many other similar combinations. Whatever you want to call it, it is a great way to start a hat or any other item that is worked in the round.
 1)Create ring and position with working yarn on top.
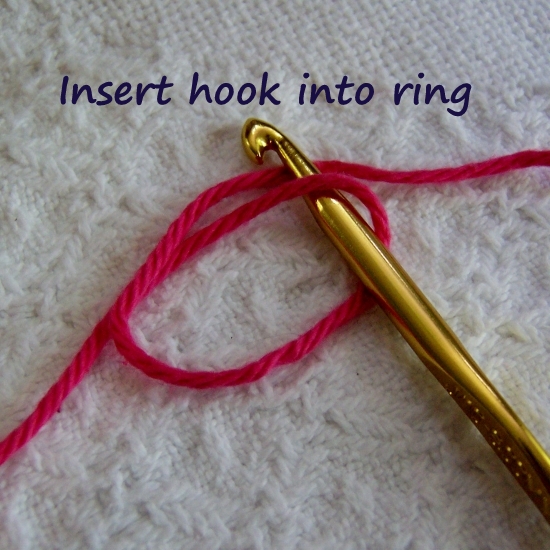
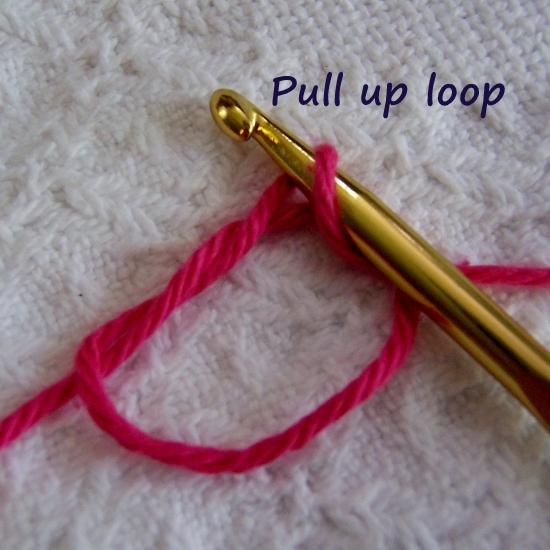
2) Insert hook into ring and pull up a loop.

3) Secure with a chain stitch.
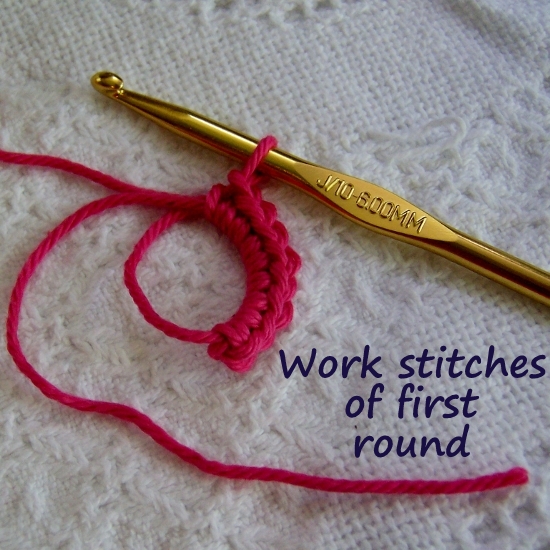
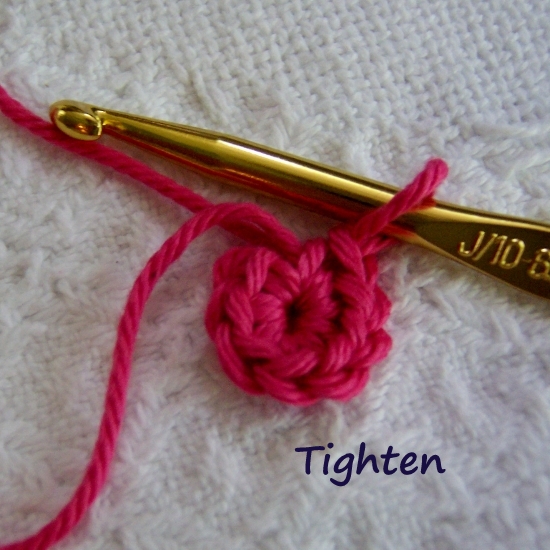 4) Work stitches of 1st round (sc here) over both BOTH strands of yarn and pull tight with the END strand.
5) Continue with pattern.

When I started making them, I wasn’t sure  how to attach the braids just right. It took a lot of practice but I believe I have perfected the look. Follow the tutorial below and you can too.
Tutorial-earflap braid
Tip-When I complete the earflap, I leave a long tail and rather than work the ends in, I work it into the braid. Two less ends to work in!
RS=Right Side WS = Wrong Side
1) For 10” braids, cut 11, 22” pieces of yarn. Fold in half.Insert hook from WS to RS of earflap and pull the yarn through. (I find it easiest to use a large hook, size J or larger)

")
2) Pull the ends of yarn through the loop and tighten. Make sure you even out and tidy up any loose strands.
")
")
3) Braid, tie off and trim ends. Repeat on opposite side making sure braids are the same length.
") Enjoy!
Enjoy!
Candy Corn Earflap Hat,
Crochet by Darleen Hopkins
