I love herbal teas and I love to drink tea while at work. It helps to keep me warm as my office building is really cold. Add to that I’m usually cold when others are not and that my job is sedentary and you get a very cold me. I have a space heater, an extra sweater and a throw blanket in my office. I just recently purchased an electric tea kettle and I love it. However, I found that I had to keep reheating the water for my second and third cups of tea. So the crafty in me kicked in and I decided it was time to make a tea cozy.
I got up early Saturday morning and while having a cup of coffee with my husband, we heard a bang and the power went out. Great. No power = no water = no shower. Thankfully he was already ready for work so he left. Without power I had nothing to do. There was enough daylight coming in so I decided I’d start working on the tea cozy. Rummaging through a box of pre-felted wool sweaters saved for a throw rug I hope to eventually make, I found this really cute striped sweater. 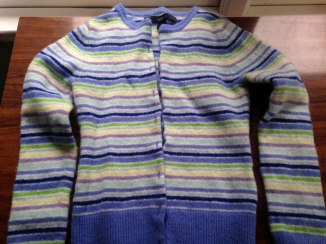
I pinned the sweater together and cut around the arms and neck. I forgot to take a photo of this step so I drew on the cut lines, below. If you are making one, you would want to make sure you have everything pinned together first and make sure your cuts are as even as possible.

The cozy was looking like it was going to be too tall so I trimmed off the bottom ribbing. The sweater was originally a cardigan so I opened it and traced the shape onto eco-fi felt to use as a liner. This felt is very cool as it is made out of 100% recycled bottles!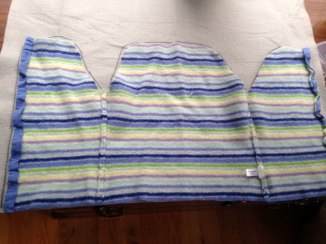
At this point the electric company showed up and determined the cause of our problem was a poor squirrel. The little guy got on the transformer thingy and was electrocuted. 😦 They trimmed back the tree limbs that were too close to the pole and replaced the damaged part and our electric was back on in a jiffy. Thanks guys!!! FYI-save the squirrels and keep your tree limbs well trimmed near power poles. I know I will from now on.
With the power back I was able to steam the sweater and the felt so they were nice and smooth. I trimmed the edges of the both the sweater and the eco-fi felt so they were even then trimmed the liner so it was just a little bit smaller than the sweater. The next step was to sew the two end pieces together and across the top.
Next I turned the sweater inside out and sewed the opening closed and across the top. Then turned it right side out. This step probably would have been a lot quicker if I used a sewing machine. My sewing machine and I don’t always get along so I decided to hand sew it.
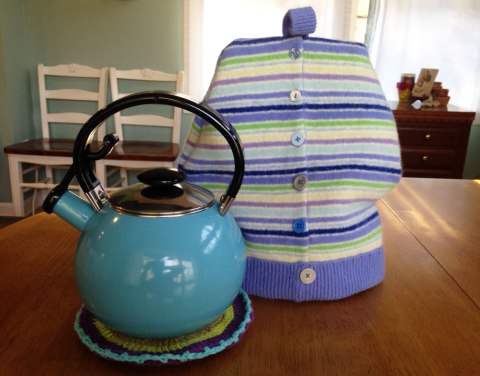
 Next, the liner was inserted into the sweater and sewn together along the bottom seam. I decided to sew the ribbing over bottom edge of the cozy to add some stability. Last, some random buttons where sewn where the cardigan button holes were and a little tab was added to the top. Success! An adorable tea cozy made of recycled and re-purposed materials! If I had thought ahead, I would have added the trim, tab and buttons before sewing together and before adding the liner. This may have saved some time. But I was making it up as I went along and it worked out fine. The end result would have been the same. It was a fun project for a lazy Saturday. I tested it out with my stove top kettle and it works great! I can’t wait to use it at work.
 Happy crafting!!


