I love thrifting. Thrifting or buying secondhand is a great way to save money, prevent waste and support local nonprofits. And for those that are a little icked out by thrift stores, then please, instead of tossing your unwanted items in the trash, please, please, please donate them to thrift stores so those of us that aren’t bothered by the ick, can keep the cycle going.
Whenever I need something, I will often look at a thrift store first before buying new. And sometimes I just stop by local thrift stores to see if they have something I didn’t know I needed. 🙂 That’s what I did earlier this week. My husband and I had gone hiking at Project Chimp-if you are ever in north Georgia, check it out! We hiked the very steep white trail and were able to see a couple chimps from the observation deck using binoculars . We also heard them a lot while hiking. It was neat and I hope to one day manage to get tickets to one of their public events to see the chimps up close. After hiking we had lunch at a fantastic Cuban style restaurant in Blairsville, GA called Nani’s. Check them out if you are ever in the area-no website but Google it. The fried plantains and the Chicky plate are fantastic and consistently delicious. After lunch we went to a nearby thrift store that supports the local Humane Society. This place is huge. I was lucky enough to find a set of double pointed knitting needles and a skein of yarn for 50 cents each. Whenever I buy something at a thrift store, the first thing I do when I get home is clean it, aka remove the ick. The yarn didn’t appear dirty but had a slight smell like it had been in storage and therefore needed to be cleaned before using. So how do you clean a skein of yarn? Easy!
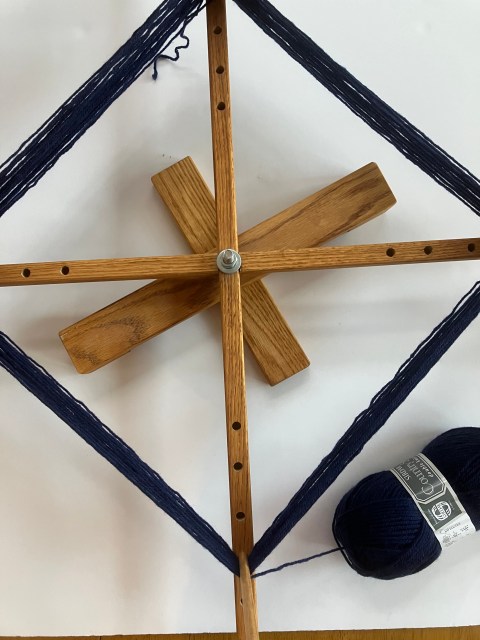
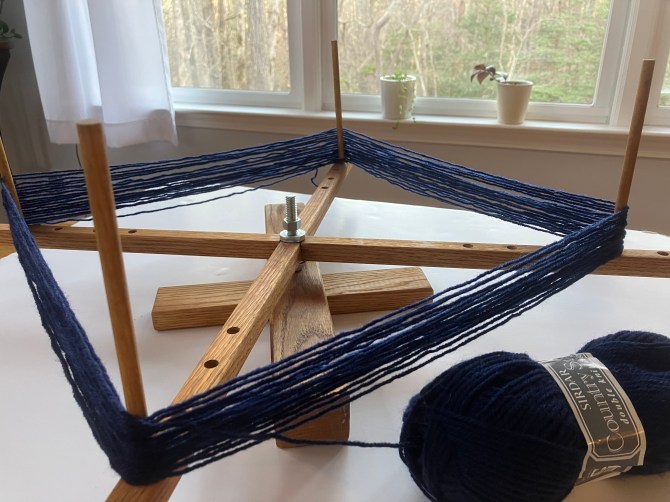
First, wind the yarn into a hank or a loose circle. I use my yarn swift but you can do this manually by winding the yarn onto the back of a chair or something else that will create a large circle of yarn. See photo below.
Next, tie the circle of yarn four or five times evenly spaced out around the circle. Make sure you tie up both ends of the yarn. The purpose of this is to keep the yarn together so make sure you knot the ties well.
Now wash the yarn! Check your yarn label for washing instructions. My yarn label stated machine wash and dry so I placed my circle of yarn into a mesh delicates laundry bag and washed and dried it along with some towels. I did remove the yarn from the dryer before the end of the cycle as I knew the towels would take a lot longer to dry than the yarn.
Once the yarn was fully dry, I placed it back on the yarn swift and wound it into a ball. Now the yarn smells fresh and is ready to use! It’s that easy.
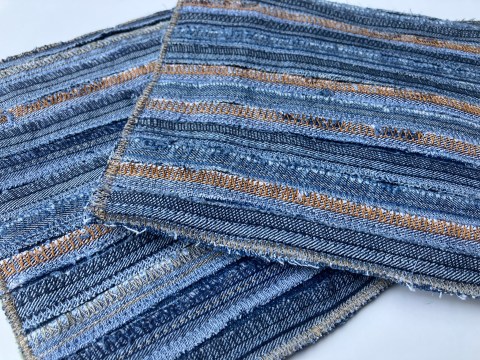
My latest crafting passion is upcycling denim jeans. I’ve been wanting to do this for awhile now but didn’t have a sewing machine capable of handling the thicker fabric. I also don’t have much in sewing skills but I’ve never let me stop that before. 🙂 I recently purchased a used, almost vintage, Bernina sewing machine and really love it. It was a great buy, sold to me by a woman I met at a weekly craft group I attend who really just wanted it to go to someone who would use it and enjoy it. Well, I’ve done that and more. I’ve been playing around with the machine a lot and came up with this fun, thrifty and eco-friendly hot pad.
My final hot pads are approximately 9″ by 9.5″ and use inseams from four or five different jeans. Please note, my instructions are not designed to be presented as a professional pattern. I am a beginner sewer and therefore just explaining the steps I used to make the hot pads.
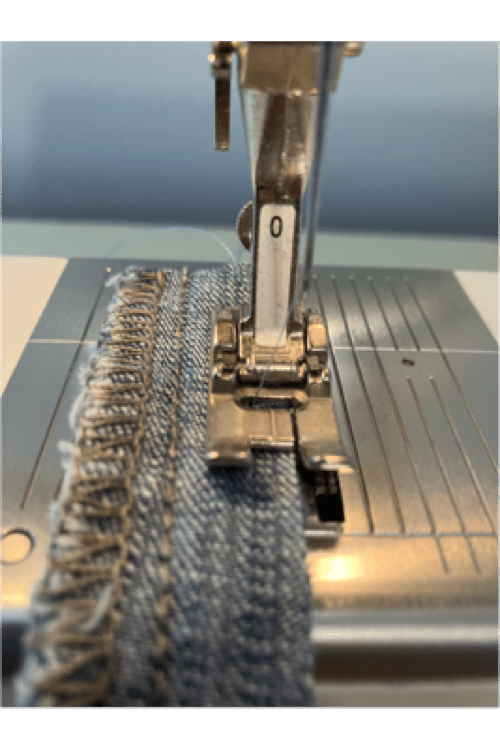
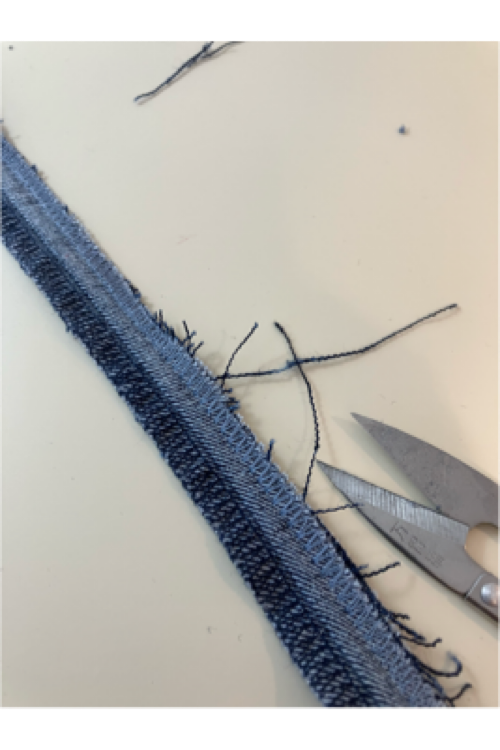
Prepping inseams: Turn the jeans inside out and cut out the inseams leaving 1/4″ of fabric from the inseam. Save the rest of the jeans for another project. Press the raw edges together with an iron. Seal the raw edges of the inseam with a zigzag stitch along the edge using a matching thread. I did two rows of stitching, all the way down and then back up over the same stitches to really seal in the ends and prevent fraying. Trim any loose ends. I used Coats and Clark all purpose thread color #4660 Denim. This color seems to blend in fairly well with most jeans. Once the seams are sealed, cut into 10″ strips and press again to completely flatten and straighten out any curves.
Seal in ends with two rows of zigzag along raw edge.
Trim any loose threads.
Supplies: 12-13, 10″ inseam strips from four or five different jeans with different colored threads prepped as mentioned above.
2, 10″ by 10″ denim squares. If necessary, sew two smaller scrap pieces together to use on the backside of the hot pad.
10″ by 10″ batting/insulation. I used pieces of an old, damaged, felted 100% wool sweater sewn together to form a 10″ by 10″ square but you may also use quilt batting, old mattress cover, a few layered t-shirts sewn together, or anything that will give enough thickness to insulate from heat.
Contrasting thread, I used a golden brown.
Steps:
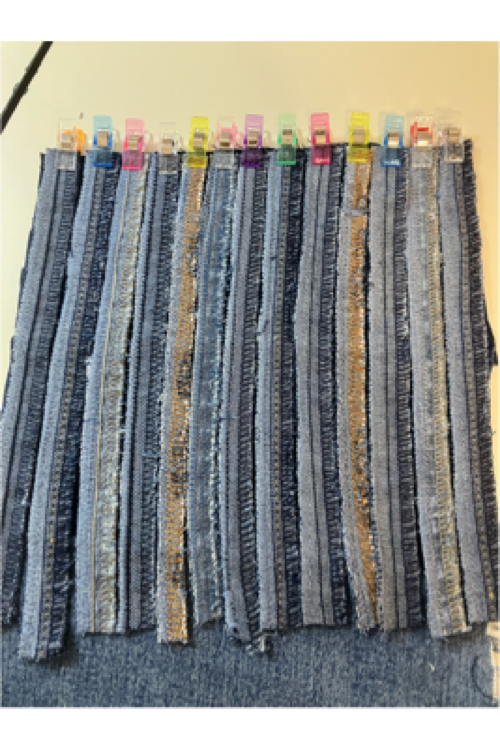
First, line your prepped inseams side by side on one of the 10″ by 10″ denim squares. I used clips to hold in place. With a matching thread, run a quick stitch across one end to secure them to the denim square. Then using a straight stitch, stitch down the middle of each seam.
Second, layer your second piece of denim square with wrong side facing, then the batting/insulation, then the top piece with the attached seams, right side up. Your batting/insulation should be sandwiched between the two denim pieces with the right sides facing out. Clip together. Trim any pieces that are too long. Make sure all edges are flush.
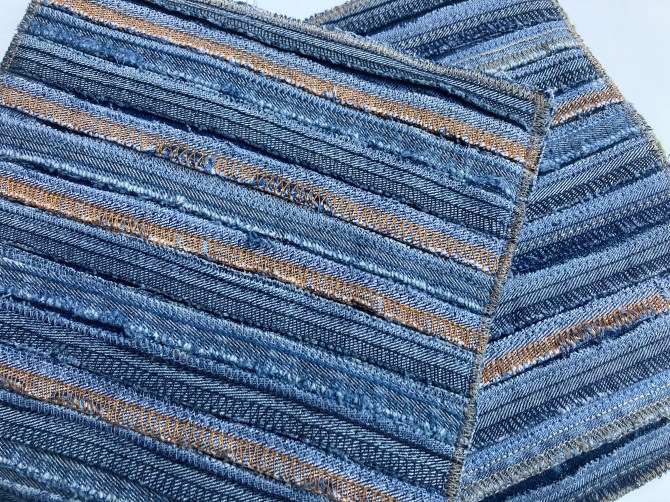
Third, using zigzag stitch and a contrasting thread, sew around the perimeter of the hot pad securing all three layers. I went around three times I believe.
Last, Enjoy!
Note on the jeans I use to upcycle: I buy thrift store damaged/clearance items and rarely pay more than 99 cents per pair. I use all types of denim, most have a mix of cotton, spandex and some with polyester. If my project requires it, I will add interfacing to prevent stretching. My goal is to use as much of the jeans as possible including the inseams, hems, waistbands, zippers and pockets.
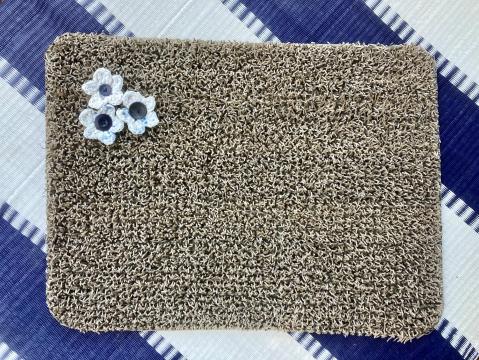
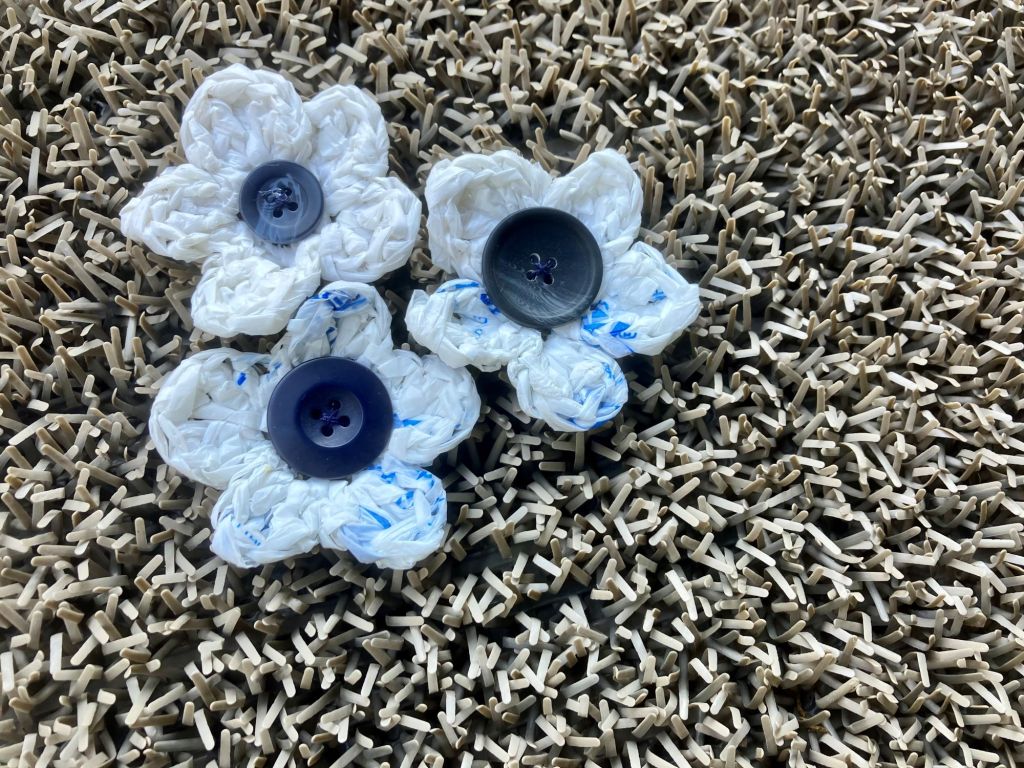
Hello All! I’d like to share a fun, cute project I just completed…three plarn flowers to adorn a doormat! Earlier this month my husband and I took a three week adventure in our new-to-us travel trailer. About mid-way through we realized we really needed a doormat to help control the amount of dirt/leaves/grass that was being tracked into the camper. I jokingly mentioned the vintage green doormat with the daisies in the corner would be perfect and surprisingly, he agreed! A quick internet search indicated the vintage style doormat is available online and also offered at some ACE Hardware stores. We stopped at the first ACE we could find and unfortunately, they did not have any in stock. Disappointed but knowing we really needed to deal with the debris being tracked into the camper, we purchased a plain taupe doormat. It worked great and a day later I decided I would crochet some plarn daisies to decorate our doormat.
I decided to use plarn (plastic bag yarn) so the flowers would not be damaged or grow mold when the doormat got wet. You can find a great tutorial on how to make plarn here: http://thecrochetfoyer.blogspot.com/2012/03/how-to-make-plarn.html. Keeping with an upcycle theme, I pulled three random dark blue buttons from my button jar for the middle section. I followed my Spring Blossoms hair clip pattern, only I made five petal flowers instead of seven petals. I sewed the flowers and the buttons to the doormat and then gave each a little squirt with a glue gun both under the button and the back of the doormat where they were sewn.
I’m really excited with how cute the doormat turned out and how great it looks with our blue and white campground mat! We have another trip planned for the last week in October and I am really looking forward to using our new, adorable doormat!
A couple years ago, the image below showed up in my Facebook feed with a challenge to use less plastic in during the month of July. Plastic drives me INSANE. I don’t want to use it but it has become almost impossible to avoid, particularly at the grocery store. Produce is pre-wrapped or pre-bagged in plastic, sour cream comes in plastic, lunch meat, bread, cereal, snacks are all packaged in plastic. Juice and vinegar and milk are bottled in plastic. It is EVERYWHERE. So what do you do when you want to do what is right for the planet and cut out plastic? That is where the 3 R’s come in. Reduce, Reuse, Recycle. Say it with me… Reduce, Reuse, Recycle. Did you notice recycle is last? It is last for a reason. Recycling, while better than tossing plastic in the landfill which leaches toxins into our ground water and may eventually find its way in our oceans, should be your last option. Recycling is expensive and uses energy. The best thing you can do is reduce your use of plastic. And when you have plastic, reuse what you have. And when you can no longer reuse the item, recycle it.
So what does this have to do with crochet? A lot. Because when you add crochet to anything you add fun. Adding crochet to Reduce, Reuse, Recycle is nerd heaven for me. I’m passionate about the Earth and I’m passionate about crochet. While there are lots of ways to reduce your use of plastic, below are a couple suggestions on how you can use crochet to help reduce your plastic use.
First #1! BYOB. Bring your own bag is #1 on the list above and by far the easiest way to cut back on single use plastic. Really any bag will do but if you like, you can crochet a bag or two or more. When my oldest was in kindergarten (he is now a senior in college) I made a bag out of plarn (plastic yarn made from used plastic bags). I love it and it is super strong. I always load it up with cans and jars when I grocery shop. I didn’t use a pattern but there are a bazillion patterns out. A quick Ravelry search yielded over 1,000 market bag patterns.
2. BYOW. Bring your own water bottle. I’m not going to suggest you crochet a water bottle as that would be weird, but you could crochet a water bottle carrier. This would make it a lot easier to bring your own water with you. Here is a quick Ravelry search for water bottle carriers. Next time you go to restaurant and they ask if you would like a drink/straw, you can say, “No thank you. I’m doing my part to reduce the amount of single use plastic waste and brought my own water in this awesome water bottle carrier that I crocheted myself!” or something like that.
3. BYOC. Bring your own cup. Post-covid this one is a little harder as some companies are not refilling reusable cups or offering refills. Like everything, I think this will eventually pass but if you need a coffee fix every day, just brew it at home and bring it to work with you. Or get your own personal coffee machine for your office. I make coffee using a French press and use this homemade cozy to keep it warm while brewing. Or you could crochet a cozy. Skip the lines, save time and money, and make your coffee yourself.
4. BYOL. Bring your own lunch. Pre-covid I would bring my lunch to work and intend to again once I’m back in person next month. I pack it in an old personal sized cooler that one of my boys used to use in grade school. The strap is broken and the zipper is messed up on one place. But it still keeps food cool. So I carry it in-you guessed it-a crocheted bag I made. I use reusable containers for my lunch and do not use single use plastic baggies. I bring real forks and spoons and a cloth napkin.
5. BYOU. Bring your own utensils. This one is my favorite because this one took me awhile to figure out. When we eat out, we often go to casual dining places (pre-covid and we will begin again, eventually). Not quite fast food but you still order at a counter. These places often have plates or baskets that get reused but tend to offer plastic forks/spoons/knives and cups and straws (see above for BYOW) that end up in the trash. The light bulb turned on one day when we were eating out and I now use an eyeglass case to carry my own utensils with me. I keep it in my purse and never need to use a disposable fork/spoon/knife while away from home. Read about it here, Eco-Craft, Plastic Utensil Carrying Case
6. BYOPB. Bring your own produce bag. Yup, there is a pattern for that! Crochet Produce Bags. I never understand the purpose of produce bags. You are going to either peel or wash the produce before you eat it. And you are going to put it in a bag after you check out. One day I watched a guy put bananas in a plastic produce bag and then tie it shut. WHY? They are already bunched together and sealed in a natural wrap that you don’t eat. I’ve seen some people single items in plastic produce bags. One butternut squash in a bag-again, why? you are going to peel it before you cook it. Oh well, not my job to judge. Unfortunately, so much produce is pre-bagged in plastic. But if you feel you need another bag for them, try crocheting a light-weight bag to transport the loose fruit and veggies.
7. Eat at home. I think covid has taught us all that this is not only possible but a great way to slow down and enjoy dinner time. Dinner doesn’t have to be eaten in the car. However, if you can support restaurants and businesses struggling to come back, do. Just do it Eco responsibly and make the trips to fast food the exception, not the norm. Crochet some hot pads and placemats and enjoy a home cooked meal.
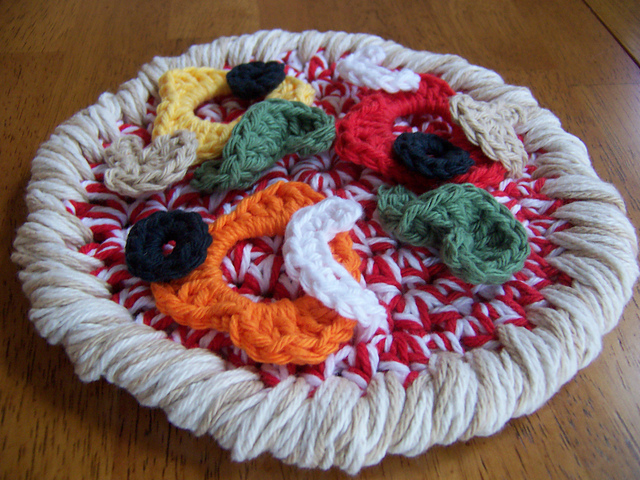
Pizza! Pizza!
8. Food storage. No need to buy plastic or even glass storage containers. Clean and reuse what you already have. And why not dress them up while you are at it?
9. Share the tips. Done.
Do you have any other ways you use crochet to reduce plastic usage? I’d love to hear them.
Happy Crocheting and Happy Reduce Plastic Usage! Darleen
Eco-Craft: Making a Laptop Stand from Household Materials
If you follow my blog you know that in addition to crochet I am passionate about the environment. So whenever I feel like I need something new, I often look for environmentally friendly options first. Can I make it? Can I pick one up secondhand? Can I buy a handmade option vs plastic junk? Sometimes there are no great options and I end up having to order online from a big box store, but when I can, I do try to come up with an alternative.
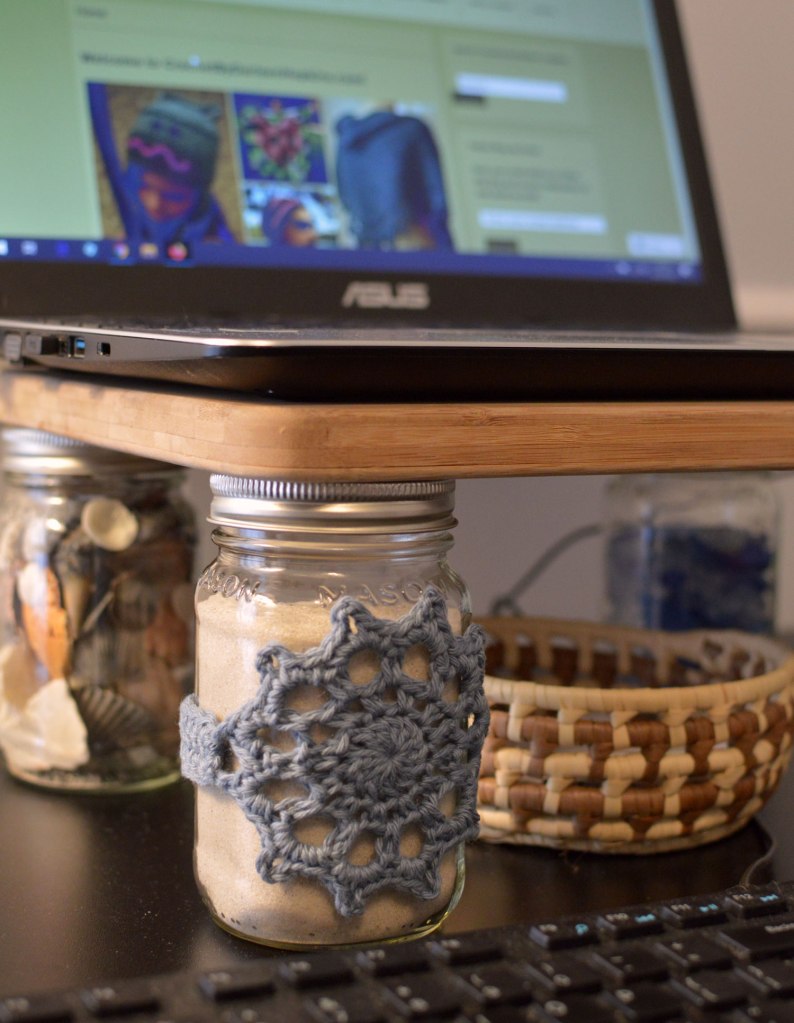
DIY laptop stand made with mason jars, cutting board and crochet!
With COVID shelter-at-home orders in place, my work transitioned us all to work remotely. I’ve been working at home for over five weeks now. I really do like it although I am missing my work station. In my office I have a variable height desk and two massive monitors. It’s been an adjustment working on just a laptop, but one that has been surprisingly easy. After a week I realized I needed to raise my laptop to eye level. Too much looking down was bad for my neck. I found a box that was the right height and used that for a couple weeks. But I got sick of looking at that ugly brown box. Stuck at home without access to thrift stores had me initially looking online for a laptop stand. Once I saw how basic and how expensive it was for plastic junk, the DIY in me knew there had to be a better, Earth-friendly option.
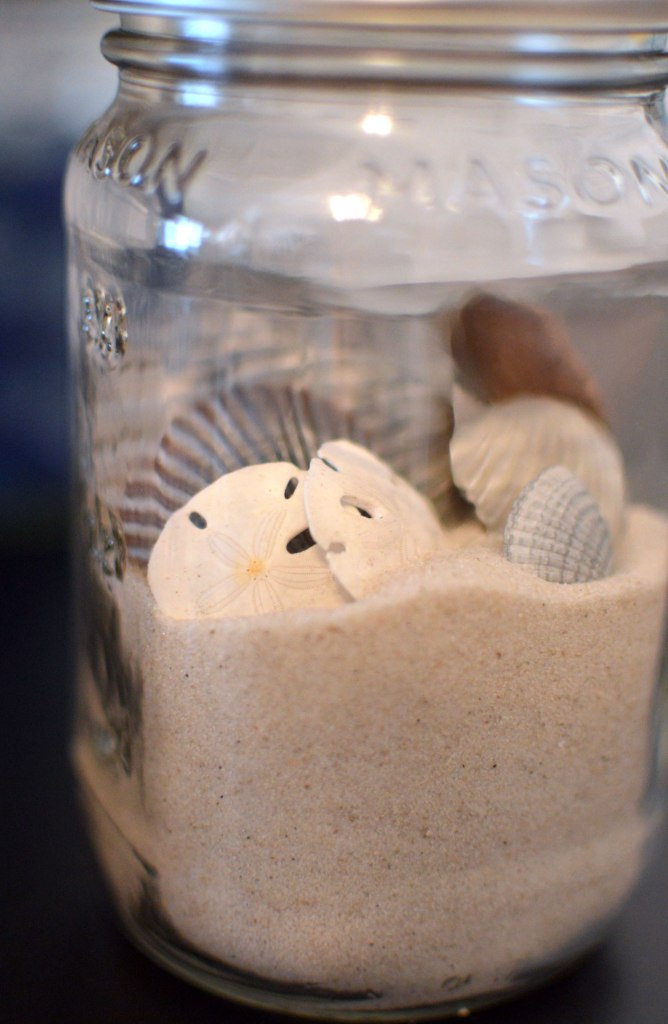
Like most projects, I thought about this one for a few days trying to figure out the best way to make the project work. I decided on using four mason jars and an old cutting board. The jars were saved from store-bought salsa. The cutting board was one that I have been meaning to replace. It was old and had started to split as ***someone*** ran it through the dishwasher a few times. Split cutting boards are not good to use as bacteria can get in the cracks. I knew it was important for the jars to have some weight to them to add stability to the laptop stand. I had enough sand for two jars. The third is filled with blue sea glass purchased at least 15 years ago. The last is filled with shells collected from one of our beach trips. The two sand jars were a little plain looking so I added a display of some of the nicest shells in one. The second I decorated with a crocheted motif using stash yarn. This was inspired by my Zinnia Votive pattern. I used the motif from the pattern and secured it with a crocheted band around the back. The cotton and linen yarn (CotLin by KnitPicks) in Raindrop, looks great, is the perfect dusty blue, and contrasts nicely with the white sand. The jars were secured to the cutting board with hot glue. Now when I’m working on my computer, not only is my neck happier, but I am surrounded by crochet and memories of good times with my family at the beach. All for zero dollars and zero impact on the Earth.
Crochet used to decorate a mason jar in a DIY laptop stand. Sea shells my family collected on one of our beach trips!
And an added bonus is the space under the laptop. Underneath the stand I placed a basket. Now my computer glasses, cleaning cloth, and lip balm are close at hand but out of the way.
Ta-Da! an awesome laptop stand!
I purchased a new cutting board to replace the one used in the project. I did have to go online to a big box store but at least it is made from bamboo-an environmentally friendly material.
My office/guest room is the latest room painted in my quest to repaint my whole house. I first blogged about it here and my last post was about the first thing I added to the freshly painted walls in this room. I’ve got a couple more crochet themed projects planned for the office/guest room, if I can ever get to a thrift store for supplies!
You can easily make one yourself. If you can’t find a old cutting board, a book, mirror, or any other solid, flat board will work. Just be sure to add some weight in the supports as you don’t want the stand to be top-heavy. If you are using glass jars, you can fill them with decorative stones, loose change or marbles. Your neck will thank you. 🙂 Happy Crocheting! Darleen
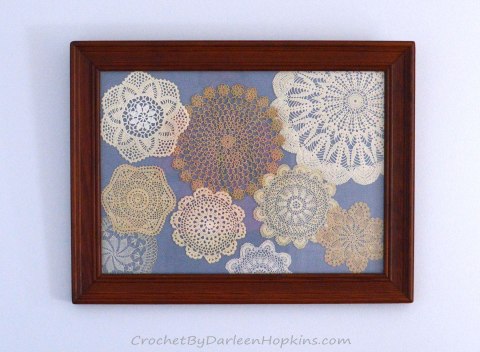
Turning Grandma’s vintage crocheted doilies into wall art.
I have fond memories of visiting my grandmother and uncle. My parents, brother, sister and I would drive from Long Island to Columbus, Ohio just about every Christmas break. Grandma always had an assortment of delicious homemade cookies ready for us when we arrived and the holiday meal always came with fruit suspended in green jello. My uncle would take us to the A&W for a root beer float and we would play ping pong in the basement and canasta in the living room. My brother usually won the ping pong and canasta games. He was always good at all types of games. I remember my grandmother teaching my sister how to sew and her showing me how to make french knots. I also remember all the doilies. My grandmother had them all over the house. She had many Dresden dolls (I always called them “Lacy Ladies”), Hummel figurines, and other collectibles. Each was placed upon a doily. These doilies are some of my earliest memories of crochet. Although I’m sure I didn’t realize how they were made, I remember I always loved the beautiful lace and symmetry of them.
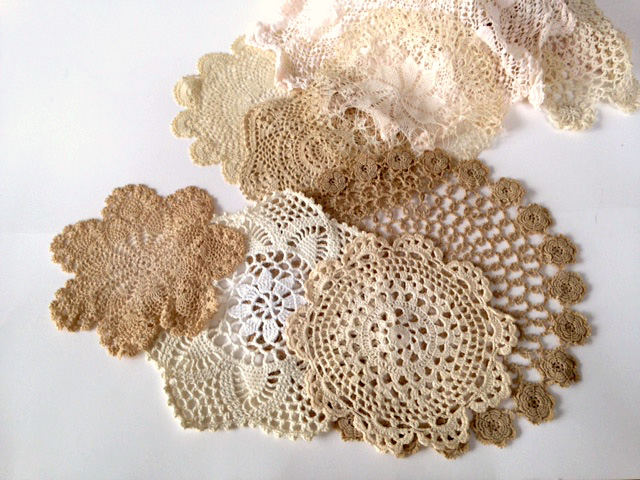
Grandma’s vintage doilies
My grandmother passed away in 2003 (98 yrs old!). My uncle continued to live in the family home until he passed in 2008. And when he passed it was time to clear out the house. In doing so, we all brought home items that were special to us. One of the items I kept was a collection of doilies. Ever since I have been wanting to do something with them but not sure what. My home isn’t the doily and figurine type so I knew it would have to be a project. Eventually I figured out I would frame the doilies and display them as art.
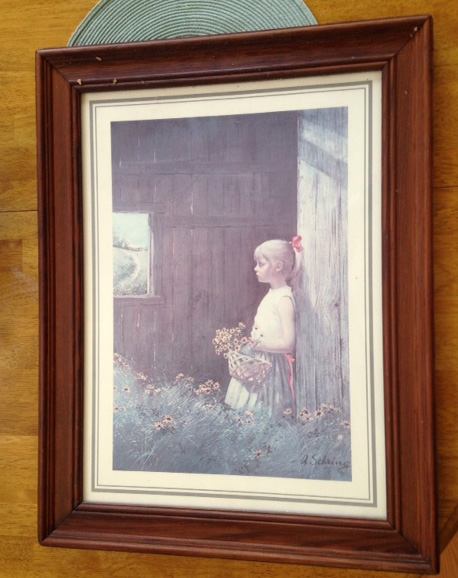
Not only is this project special because it is a reminder of the good times with my grandmother and uncle but it is also a reminder of my brother. When I graduated from college (1991) he let me live with him for three months while I completed a management training program. I’m sure that wasn’t the most exciting thing for him, having his little sister crashing in his new duplex, but we made it work. And it was a huge help to me as I didn’t know where I would be transferred to once I completed the training program and therefore did not want to commit to a lease. While I was living with him, I started collecting items for my future apartment in the corner of the room where I slept. The pile grew as I often stopped by yard sales on the weekends. One of my purchases was a framed print. I moved that print to my first apartment in Elmira and to many other apartments after that. Eventually the print faded but I always kept it because I loved the wood frame. This is the frame I used in the project. Seeing it reminds me of my brother and his generosity to open his home to me. It is a reminder of how important family is and of how we need to make time for each other. My brother passed away in July, 2019. He was only 57.
The print, now faded, purchased at a yard sale while I lived with my brother.
So, how did I make it? First I cleaned up the glass and revived the wood frame with Old English wood polish. I spent about a week trying to figure out how I would make the background. My original thought was to purchase a solid framing mat but with the COVID-19 pandemic, the local framing store was closed and my shopping options were very limited. I looked at poster board online and even thought about painting cardboard for the background. Then, on my essential once-a-week-outing of shopping for food and supplies at Walmart, I took a quick look in the craft section and found a pre-cut section of beautiful blue knit fabric for $2!! It was perfect. I selected nine doilies from the collection to be displayed. Seven are crocheted, one is knit and one I believe is tatted. The doilies were steamed flat, placed in position, and voila!, beautiful crocheted wall art.
Beautiful wall art made with vintage crocheted doilies.
I didn’t start crocheting until a year or two after my grandmother passed. It saddens me that I didn’t get to share this craft with her. My grandmother was extremely talented in crafts and could sew just about anything. Years ago I had asked my uncle if Grandma crocheted and he could only remember her making an afghan. My father doesn’t remember either. So I’m not sure if my grandmother made the doilies or if they were given to her by friends or other family members. But I do know they are beautiful and bring comfort of warm family memories when I look at them. The total cost of this project was less than $6 (fabric, hanging hardware and poster board to seal the back), but to me, it is priceless. It is a beautiful reminder of childhood memories and of family who are no longer with us.
Every summer we have an issue with fruit flies. As soon as the weather turns warm POOF they appear. And this summer was no different. Most years they aren’t too bad but for some reason they were worse this year. I did some research online and found a few do-it-yourself options for fruit fly control. One that stood out was to make your own trap with apple cider vinegar. The site suggested pouring apple cider vinegar in a bowl and adding a few pieces of fruit. It then said to cover the top with saran and poke a couple of holes in it. The idea was that the vinegar and fruit would attract the flies, they would enter via the holes and then get stuck. Well, this worked for a few days and it seemed like the flies were going away. Then we started seeing more and more and more flies. What the heck? So I looked at my “trap” and realized I WAS BREEDING FRUIT FLIES! The buggers had laid eggs on the fruit and enough had figured out how to get out of the “trap”. So much for that idea. At this point the amount of fruit flies in my kitchen was so bad that I broke down and purchased fly ribbon. You know the stuff. Flies are attracted to the icky sticky goo on the ribbon, get stuck to it and die. Tacky, both literally and figuratively. But desperate times call for desperate measures and I hung a couple strips up in the kitchen. Within 24 hours they were full. Thankfully I was able to get rid of most of the flies but the sight of those nasty strips was beyond GROSS. So I had to come up with a better solution. And back to the inter-webs I went. This time I found a site that suggested a similar method but omitted the fruit (duh) and added a couple drops of dish soap to the apple cider vinegar. I tried this method and it worked! This time the buggers drowned, sorry little guys, and most certainly were not breeding. Yippee! But it was still ugly to look at. Not near as bad as the fly strips, but still, ugly. This is where crochet comes to the rescue.
The Zinnia Votive is a pattern for a sleeve that covers a small jelly jar. I pulled mine off the shelf, replaced the votive inside with apple cider vinegar, added a couple drops of dish soap, covered the top with saran, secured with a rubber band, poked a couple holes in the top and now I have a the prettiest fruit fly death trap that has ever existed. 🙂
Fruit flies enter this pretty trap and never, ever leave.
I keep my Zinnia Fruit Fly Death Trap on my kitchen counter, just behind my bananas. Every couple of days I check it and sure enough, there are fruit fly corpses floating in it. I change the solution inside weekly because dead flies are gross. And I put in just enough solution to catch the files but isn’t visible above the bottom band. If you find yourself with one too many fruit flies in your home, you may want to give this pretty trap a try.
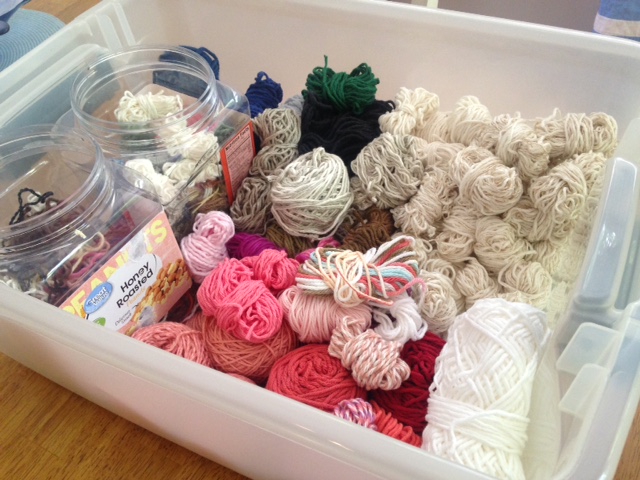
I’ve mentioned before that I am trying to use up my much too large yarn collection. While I’m not near the end of it yet, I had noticed I was getting more and more partial skeins and bits and pieces. I also had a collection of swatches, unsuccessful design WIPS and projects that were abandoned when I realized I didn’t have enough yarn to finish. So I took some time this weekend to work on my scrap yarn stash. I pulled out all the scraps, partial WIPS, design fails and swatches of yarn that had been discontinued. Everything was frogged and balled up. I’ve been inspired by Grace’s Bits and Bobs Mother Bears so I put all the tiny scraps in one bin and the even tinier ones in another. I’ll need to make a magic ball with them at a later date. It was like going down memory lane frogging some of those items. Some dated back to my very first published design, theI Do Blanket, where I was working out different ways to attach the rings.
I’m excited to have this section organized. When a yarn is discontinued, I won’t use it for a new design. The discontinued yarn is what I use when I make Mother Bears or other small items for personal use. Having them all together and ready to use will make it a lot easier when I’m ready to start a new project. I haven’t yet dived into the partial skeins, unsuccessful design WIPS, abandoned projects or swatches of current yarn, but I’ll get to it. For now, they are in the appropriate stash box with full skeins of the same yarn.
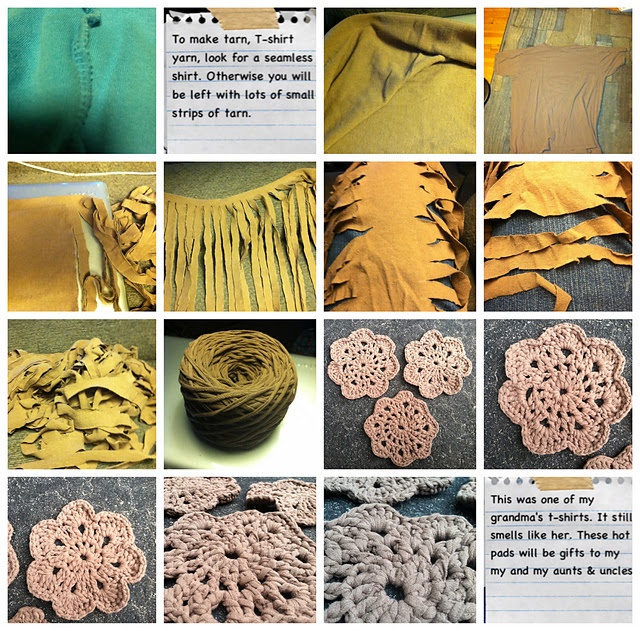
I belong to a few groups on Ravelry. I love how groups have themes and I love when someone in the group starts a thread with a theme. In honor of Earth Day, one of the groups started a thread called Reduce, Reuse, Recycle and I was super excited to see what others would post. I wasn’t disappointed when KristyRecycles posted about three hot pads she made out of tarn (T-shirt yarn = tarn). While I have seen a lot of projects made with recycled t-shirts, I was really touched by her motivation for the project.
After my Grandma past away (a few years ago), my aunts, mom, and I were going through her things. Any t-shirts that didn’t have a side seam I took home and made tarn out of. When not working on it, I kept it in a sealed bag so that her smell stayed on it. I made these hot pads from one of the shirts, and gave them to my mom and 2 of my aunts for Christmas.
Hot pads Kristy made with tarn from her grandmother’s clothing.
I asked Kristy if she would like to interviewed for my blog and she graciously said yes. Please read about this eco-concious crafter.
How long have you been crocheting and/or knitting?
I have been crocheting for 33 years, knitting for 17 years, and weaving for 24 years.
Was your grandmother a crafter?
My grandma was a quilter and a sewer. I own a couple of quilts that my great-grandma pieced from my mom and her siblings’ clothing, and my grandma quilted. My grandma sadly had to stop sewing when her arthritis got to bad. When she passed away, the family agreed that I could keep her mother’s singer sewing machine, because I am the only quilter in the family (blood relative that is…and it’s a very large family). One of my childhood memories is of her letting me raid her fabric stash, which I made some Barbie clothes and clothes for myself from.
What was your inspiration to make the hot pads from your grandmother’s t-shirts?
The day after her funeral, my mom, some of my aunts, and I went to her trailer and were going through her bedroom. We were sorting items to be given to different family members, to be donated, and things to be thrown away. There was a shirt that didn’t have any side seams, which is perfect for making tarn (t-shirt yarn) from. I asked if I could have it, which got a few surprised looks from my aunts (because who asks to keep a brown t-shirt). When I told them that I planned on making something from it, then they put aside all of her t-shirts for me to pick through before adding them to the donation box. Sadly I think that that was the only non-seamed shirt in the bunch.
Do you use the hot pads or gift them?
I was only able to get 3 hot pads out of the tarn that I had made, so I was only able to gift them to my mom and 2 of my aunts. My mom is one of 8 surviving siblings, so I had some unhappy family members that Christmas.
How else have you incorporated Reduce, Reuse, Recycle into your crochet or knitting?
For Reduce, I try to only buy yarn and craft supplies as I need it and not buying it just because. The exception to this is souvenir yarn, but I do have a go-to pattern for that yarn (and I usually make it soon after the purchase).
For Reuse: I do a lot more sewing projects under the Reuse heading, but I think that my use of scraps might fit in this group. Not only do I save all of my “too small to use” scraps of yarn, but my friends and crochet students save theirs for me as well. On a weekly to monthly basis I use them as stitch holders. Around Christmas I put them into clear ornaments and give them to friends and family. During the off season, I like to add them to shadow boxes to make fun pieces of art for my home.
After Christmas I like to crochet around my Christmas cards and turn them into ornaments. It’s a great way to have the card and to see them (and the sweet words written in them) every year. I use the inside of the card as the back of the ornament.
One trick that I learned from some knitters at the yarn shop that I use to work at (and which I have passed on to a lot of other people) is to reuse the plastic bread tags to wrap up my yarn tails so that they stay out of the way. This prevents me from accidentally working with the tail instead of the ball of yarn. I make a lot of amigurumi which require me to start with a long tail to use when the section is finished (for sewing with).
I’ve used found sticks for weavings and for coiling string and embroidery floss around. I have also used cardboard food boxes to create the cards used in card weaving, and shuttles for weaving with. Once I even made a weaving shed out of a coral box.
For Recycle: For a while recycling was a big part of my crafting world. I even had a local t.v. show based on it. I use recycled materials in all sorts of crafts. For knitting and crochet I mainly focus on making and using plarn (plastic bag yarn) and tarn, plastic bottle caps, metal jar lids, plastic bottles, pull tabs, plastic bottle rings, corks, and toilet paper tubes. I have knit and crochet plarn bags, a hat, and an amigurumi jellyfish. I really like spinning with it, especially plying novelty yarn that I no longer care for with it, because the crochet bags from it look really cool. Since moving to California I haven’t made any plarn, because plastic bags are hard to come by here. With tarn (t-shirt yarn) I have crochet bags, a walker bag, hot pads, and a rug. With the pull tabs I have crochet bracelets, purses (one used over 800 tabs), earrings, flowers, and garland. With plastic bottles, I have crochet drawstring bags where the top is crochet and the bottom is the bottle. I have also made a tool caddy out of several 16 oz soda bottles. With the plastic bottle rings (that are just under the bottle cap), I crochet around them to create mini wreath ornaments and brooches. Those rings and the pull tabs also make great ways to hang the wreaths that I have made. I have knitted little hats and outfits to put on the wine corks so that they look like little people. My husband and I don’t drink, but I have a large collection of corks because of friends and family. Right now I actually keep them and the pull tabs in shadow boxes so that they can serve as a fun decorations until I get around to crafting with them. Last but not least are the plastic bottle caps and metal jar lids. I don’t actually knit or crochet with them, instead I make pincushions out of them which I used daily. The caps and lids are the base of the pincushions. I sew felt around them, and have the stuffing (inside of felt) on top of them. The jar lid ones I use for my sewing pins, and the bottle cap ones I use for my yarn needles. The bottle cap pincushion that looks like a mushroom is the one that is in my yarn tool kit that goes in my current project bag. I like to make hat ornaments with the toilet paper tubes. They aren’t knitted or crochet, but they do use yarn and make great gifts for my yarn friends.
How else have you memorialized someone with your crochet, knitting or other crafts?
A friend had asked me to use her grandmother’s nightgowns to make pillows for her and her family members as well as 2 little purses for her daughters.
I’ve used the buttons off of my grandpa’s shirt to use as eyes on a sock plushie for my youngest son.
When my grandma passed away, I got back most of the things that I had made for her (crochet and sewn). In a way that is a memory in and of itself. Every time I see them I think of her.
In college we learned how to make paper. I embedded some childhood family pictures in the paper. You could still see the image.
I have a box of t-shirts that contain their own memories that I plan on turning into a quilt.
A few years ago I started knitting a California King sized afghan. It’s one of my movie watching projects. Each colored stripe is a whole skein of yarn. It is actually inspired by a crochet afghan that I remember my mom making for years when I was a kid. She would crochet the length of the blanket until she ran out of yarn, and then she would start with another color. It became this warm colorfully striped afghan on my parents’ bed. She still makes versions of this on a wooden knitting board. She doesn’t really care about if the colors match or even if the yarn weight is the same, its about the process for her (about relaxing). I can’t be random like her, but this afghan is an ode to her.
Once I did an exquisite corpse drawing of my grandma with family members. I’ve drawn and painted lots of pictures of friends, family, and myself over the years.
I still think of a college friend every time I look at some small woven bags that I made in college, because I used her waste yarn (cut from the warp) from a hand dyed floor loom project that she did. I used my tiny table loom to weave the scraps with.
I have also dedicated several bears for the Mother Bear Project to family and friends. The one most like the person is my Swiss Bear, which is named after my dad. Once he saw the picture of the bear with his forever friend, he asked me to make him an identical one for his birthday.
What is your environmentally favorite crafting item (crochet/knit/other)?
My favorite one to craft with are pull tabs. I love it when people don’t realize until closer inspection that that’s what the metal part is. But the 2 things that I use the most when crafting are bread tags and my bottle cap pincushion. They are a staple in my yarn tool bag.
What else have you made with tarn?
Here is a link to the tarn items on my project page. There aren’t too many things, because shirts that work the best, and that you don’t mind cutting up, are not usually easy to come by. I have made a large market bag (my favorite one to use), hotpads, a walker bag, and a rug. Surprisingly the tarn rug is not very absorbent. I do plan on making a dog toy out of tarn in the future.
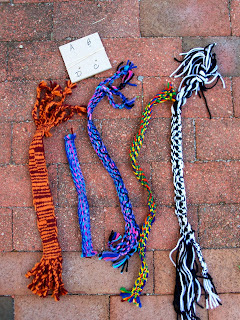
Any tips or tricks when working with tarn?
When making tarn (t-shirt yarn), look for a shirt that does not have a side seam (see the first 3 images). Also when it is time to cut the inch of the un-cut t-shirt so that you have a continuous piece of yarn, I like to lay that part on my leg so that the cut lines are very clear (See images 6 & 7). A suggestion when making the tarn is to make it outside while wearing clothes that you don’t mind changing out of afterwards. This is because little bits of the t-shirt (like fuzz) go all over the place, especially when stretching the tarn and winding it into a yarn cake.
Thank you Kristy!! Kristy is VERY EXPERIENCED in the world of eco-crafting. She sold her eco-crafts at different craft fairs for years, had an environmental local tv show for a few years, ran her town’s Earth Fair for 5 years and several years ago was the runner up in an environmental contest run by TerraCycle!
Bringing Your Own Utensils has Never Looked So GOOD!
Do you remember when you were a kid and you always wanted to be first in line? We all did because we all thought being first was the most important and no one wanted to be last. The truth is in grade school it didn’t matter who was first as we were all important. However, when it comes to the three R’s; Reduce, Reuse, Recycle, while they are all important, REDUCE is probably the most important. While all three are necessary in helping our planet, recycle should be your last resort as recycling requires energy. If we reduce our consumption of items, there’s less to recycle. And if we reuse what we have, there’s less to recycle. Less to recycle means less energy used. While recycling is good, it would be best of we all had less to recycle. Make sense?
So, what’s that got to do with a crochet blog? Well, I’m passionate about two things, crochet and the Earth. And when I can combine the two, I’m a real happy camper. So I’m super excited to share with you how I have figured out how to reduce my use of disposable, single use plastic.
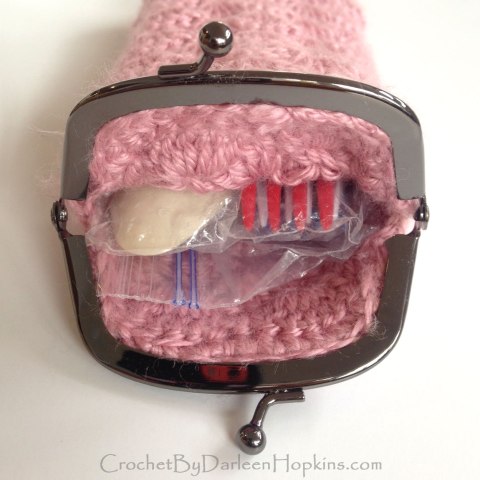
One day I was eating lunch out at one of my favorite casual dining restaurants (Moe’s) and as I was picking up a use once and toss fork, it hit me how wasteful it was. We all know there’s too much single use plastic trash in this world and I knew I needed to come up with a way to bring my own utensils for this type of dining. When I got home I pulled out my eyeglass case pattern sample and voila! it was the perfect size. I placed a variety of forks, spoons and knives in a ziploc bag and placed them in the eyeglass case. The eyeglass case, now a utensil case, went right into my purse. The plastic bag keeps the utensils clean while the soft cushioning of the crocheted fabric keeps the plastic from breaking. Going forward, I will always have clean utensils with me and do not have to use the restaurant’s wasteful, disposal utensils. And when I use one of the utensils, I just wrap the dirty part in a napkin and bring it home to wash. My choice is to use plastic ware in my utensil case, however, you could easily use your regular flatware. You just may need to make your case a little longer to accommodate the longer knives.
You can find out more about the Eyeglass Case crochet pattern here: Pretty in Pink